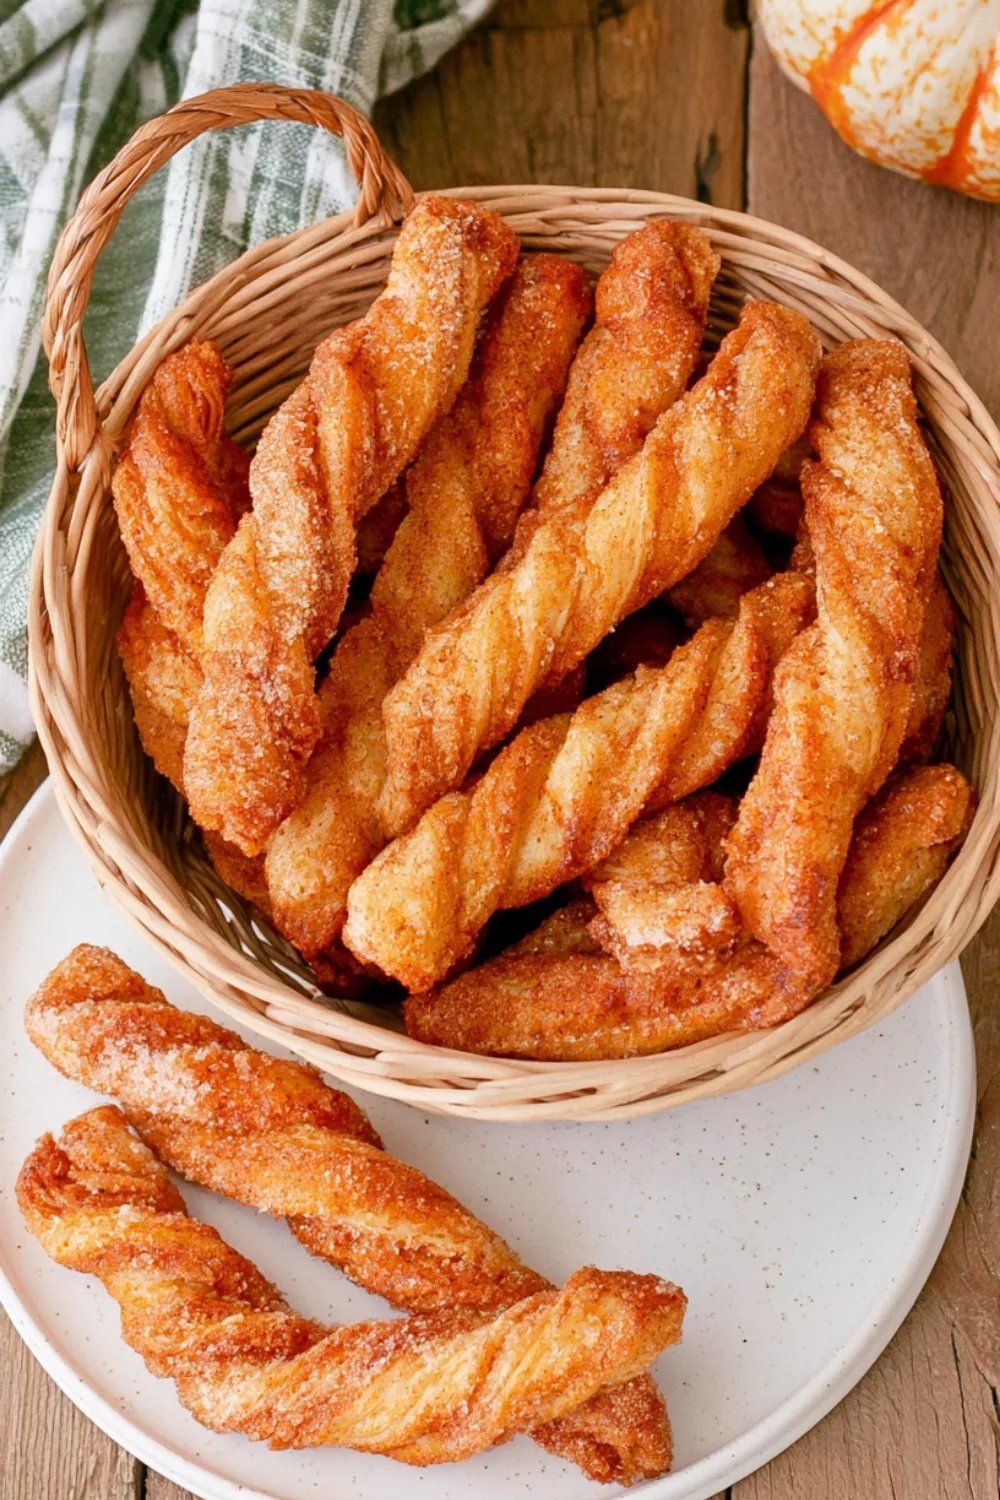
While both desserts celebrate the iconic flavors of fall, Pumpkin Pie Twists offer several advantages over traditional pumpkin pie. The most obvious difference is texture: where pumpkin pie features a creamy, custard-like filling in a crumbly crust, twists deliver flaky, layered pastry with concentrated pockets of pumpkin filling. This textural contrast makes each bite more interesting and satisfying.
Preparation time is another significant difference. Traditional pumpkin pie requires making or rolling out crust, preparing the filling from scratch, and baking for 45-60 minutes, plus cooling time. Pumpkin Pie Twists come together in about 20 minutes of active work and bake in just 12-15 minutes. There’s no waiting for the pie to set completely before serving, though they’re best enjoyed slightly warm.
Portion control is easier with twists since they’re naturally individual-sized. With pumpkin pie, you’re cutting slices that can vary in size, and it’s easy to over-serve. Each twist is a predetermined portion, making it simpler to manage servings at parties or for meal prep. Additionally, twists reheat better than pie, which can become watery or lose its crisp crust when reheated.
Ingredients You’ll Need for Pumpkin Pie Twists
Puff Pastry Sheets: The Secret to Flaky Layers
Puff pastry is the foundation of these twists, and choosing the right type makes a significant difference in your final result. Frozen puff pastry sheets are widely available in most grocery stores and work perfectly for this recipe. Look for all-butter puff pastry if possible, as it provides superior flavor and flakiness compared to varieties made with vegetable shortening.
Before using frozen puff pastry, it’s essential to thaw it properly. The best method is to transfer it from the freezer to the refrigerator the night before you plan to bake. This slow thawing prevents the pastry from becoming too soft or sticky, which can make it difficult to work with. If you’re short on time, you can let it sit at room temperature for about 30-40 minutes, but watch it carefully to ensure it doesn’t become too warm.
When you’re ready to work with the pastry, lightly flour your work surface and rolling pin to prevent sticking. Roll the pastry out gently to smooth any creases and achieve an even thickness, typically about 1/8 inch. Be careful not to overwork the dough, as this can deflate the layers that create the flaky texture. If the pastry becomes too warm while you’re working, pop it back in the refrigerator for 5-10 minutes to firm up.
Pumpkin Pie Filling: Choosing the Best Brand
Not all pumpkin pie fillings are created equal, and the brand you choose can impact the flavor and consistency of your twists. Look for canned pumpkin pie filling (not plain pumpkin puree) as it already contains the traditional pumpkin pie spices and sweeteners. Popular brands like Libby’s, Duncan Hines, and Comstock offer reliable options with consistent quality.
When selecting your filling, check the ingredient list to ensure it contains real pumpkin and natural spices rather than artificial flavorings. The consistency should be smooth and thick, not watery, as excess moisture can make your pastry soggy. If you find your filling is too runny, you can drain it in a fine-mesh strainer for a few minutes before using.
For those who prefer more control over ingredients, you can make your own pumpkin pie filling by combining plain pumpkin puree with sugar, cinnamon, nutmeg, ginger, and cloves. This allows you to adjust sweetness and spice levels to your preference. However, using canned filling significantly reduces prep time and ensures consistent results every time.
Cinnamon Sugar Coating for That Classic Flavor
The cinnamon sugar coating is what transforms these pastries from simple pumpkin-filled twists into something truly special. This classic combination creates a crackly, sweet exterior that complements the spiced pumpkin filling beautifully. The ratio is typically 1/4 cup granulated sugar to 1 teaspoon ground cinnamon, but you can adjust this based on your preference for cinnamon intensity.
For best results, mix your cinnamon and sugar together in a shallow bowl or plate before you start assembling the twists. This ensures even distribution of the cinnamon throughout the sugar, so every part of your pastry gets coated uniformly. Using granulated sugar provides the best texture, but you can experiment with coarse sugar for extra crunch or add a pinch of nutmeg or cardamom for additional warmth.
Apply the cinnamon sugar coating immediately after the twists come out of the oven while they’re still warm and slightly sticky from any egg wash or butter. This helps the sugar adhere properly and creates a beautiful, sparkly finish. Don’t skip this step—the cinnamon sugar adds essential flavor and texture that elevates the entire dessert.
Optional Add-Ins: Egg Wash, Vanilla, or Nutmeg
While the basic three-ingredient recipe is complete on its own, a few optional additions can enhance your Pumpkin Pie Twists even further. An egg wash (one egg beaten with a tablespoon of water or milk) brushed on the pastry before baking creates a beautiful golden-brown color and helps the cinnamon sugar coating stick better. For a vegan alternative, use almond milk or aquafaba.
A teaspoon of vanilla extract mixed into the pumpkin filling adds depth and complexity to the flavor profile. Vanilla enhances the warm spices and adds a subtle sweetness that rounds out the overall taste. Similarly, a pinch of freshly grated nutmeg or allspice can intensify the autumn spice notes, making the filling taste even more like traditional pumpkin pie.
For those who enjoy contrasting flavors, consider adding a thin layer of cream cheese spread before the pumpkin filling, or drizzle the finished twists with a simple glaze made from powdered sugar and milk. These additions aren’t necessary, but they can take your twists from great to extraordinary, especially for special occasions or when you want to impress guests.
Step-by-Step Instructions for Making Pumpkin Pie Twists
Preparing Your Puff Pastry (Thawing and Rolling)
Start by properly thawing your puff pastry according to package directions. Most frozen puff pastry needs to thaw in the refrigerator for several hours or overnight. If you’re in a hurry, you can let it sit at room temperature for 30-40 minutes, but be careful not to let it become too soft or warm, as this makes it difficult to handle.
Once thawed, lightly flour a clean work surface and your rolling pin. Unfold the pastry sheet and gently roll it out to smooth any creases and achieve an even thickness of about 1/8 inch. The pastry should be large enough to spread your filling evenly but not so thin that it tears easily. If you’re working with a rectangular sheet, you can keep it as is or cut it in half for easier handling.
Lightly brush the surface of the pastry with melted butter or egg wash if desired. This adds extra richness and helps create those beautiful golden layers as the pastry bakes. Be gentle when handling the dough—overworking it can compress the layers and reduce flakiness. If the pastry becomes too warm or sticky during preparation, place it in the refrigerator for 5-10 minutes to firm up before continuing.
Spreading the Pumpkin Filling Evenly
Open your can of pumpkin pie filling and give it a good stir to ensure the spices are evenly distributed throughout. Using a spoon or spatula, spread the filling over the surface of your puff pastry in a thin, even layer. Aim for about 1/4 to 1/3 inch thickness—too thin and you won’t taste enough pumpkin, too thick and the pastry may not cook through properly.
Leave about 1/2 inch border around the edges of the pastry without filling. This border helps seal the twists and prevents the filling from oozing out during baking. Use an offset spatula or the back of a spoon to spread the filling smoothly, working from the center outward to the edges. If the filling is too thick or chunky, you can thin it slightly with a teaspoon of milk or cream for easier spreading.
For more defined swirls in your finished twists, consider piping the filling onto the pastry using a piping bag or a plastic bag with the corner snipped off. This creates neat lines of filling that result in beautiful spiral patterns when twisted. However, spreading with a spatula works perfectly well and is faster for most home bakers.
Cutting, Twisting, and Shaping Your Pastry Strips
Once your filling is evenly spread, use a sharp knife or pizza cutter to cut the pastry into strips. The ideal width is about 1/2 to 3/4 inch—narrow enough to twist easily but wide enough to hold the filling securely. Cut straight down through both the pastry and filling in one smooth motion to create clean edges.
To create the signature twist, pick up one end of a strip and gently twist it 3-4 times, holding the other end steady. Don’t twist too tightly, or the filling may squeeze out. The goal is to create a spiral pattern that shows off both the pastry layers and the pumpkin filling. If the pastry becomes too soft to twist cleanly, place the cut strips in the refrigerator for 5 minutes to firm up.
Transfer your twisted strips to a parchment-lined baking sheet, spacing them about 2 inches apart to allow for expansion during baking. You can gently stretch each twist to make it slightly longer and more elegant, but be careful not to pull so hard that the filling separates from the pastry. For extra security, you can pinch the ends of each twist to seal them.
Baking to Golden Perfection: Time and Temperature Tips
Preheat your oven to 400 degrees Fahrenheit (200 degrees Celsius) before you begin preparing the twists. This ensures the oven is fully heated when your pastries go in, which is crucial for achieving proper puff and browning. Position a rack in the center of the oven for even heat distribution.
Bake the twists for 12-15 minutes, or until they’re puffed and golden brown. The exact time will depend on your oven and the thickness of your pastry, so start checking at 12 minutes. The twists are done when the pastry is crisp and flaky, and the filling is bubbling slightly. Don’t overbake, as this can cause the filling to dry out and the pastry to become too dark.
For even browning, you can rotate the baking sheet halfway through the cooking time. If you notice the twists browning too quickly on top, you can loosely tent them with aluminum foil for the last few minutes of baking. Once done, remove from the oven and let them cool on the baking sheet for 2-3 minutes before transferring to a wire rack.
Serving Suggestions and Storage Tips
Best Ways to Serve: Warm, Room Temp, or Glazed
Pumpkin Pie Twists are delicious served in multiple ways, depending on your preference and occasion. Warm twists, served just 5-10 minutes after coming out of the oven, offer the most dramatic experience with crispy pastry and gooey, warm filling. The cinnamon sugar coating is at its most aromatic when warm, filling your kitchen with the scent of autumn spices.
Room temperature twists are equally enjoyable and often more practical for serving at parties or gatherings. They maintain their texture well and don’t require constant reheating. This makes them ideal for buffet tables, potlucks, or when you need to prepare desserts ahead of time. The flavors actually meld and intensify slightly as the twists cool, creating a more cohesive taste experience.
For an extra-special presentation, consider adding a glaze or drizzle. A simple glaze made from powdered sugar and milk or cream cheese frosting adds sweetness and visual appeal. Caramel sauce or chocolate drizzle can also complement the pumpkin flavors beautifully. Apply these additions just before serving to prevent the pastry from becoming soggy.
Pairing with Coffee, Hot Cider, or Pumpkin Spice Latte
The warm spices in Pumpkin Pie Twists make them natural companions for hot beverages, especially those with complementary flavors. Coffee is a classic pairing—the bitterness of the coffee balances the sweetness of the pastry, while the warmth enhances the overall comfort factor. A medium or dark roast works particularly well, as does coffee with notes of chocolate or caramel.
Hot apple cider is another excellent match, as the apple and cinnamon flavors in the cider echo the autumn spices in the twists. The fruity sweetness of cider complements the pumpkin without overwhelming it, creating a harmonious flavor profile. For a non-alcoholic option, spiced cider with cinnamon sticks and orange slices adds festive appeal.
Pumpkin spice lattes take the pumpkin theme to the next level, creating a cohesive autumn experience. The creamy, spiced milk in a PSL enhances the pumpkin filling while the espresso provides a pleasant contrast. For a lighter option, try hot tea with cinnamon, chai, or even a pumpkin-flavored herbal tea. Cold beverages like iced coffee or apple cider can also work well, especially for breakfast or brunch service.
How to Store Leftovers for Maximum Freshness
Proper storage is key to maintaining the texture and flavor of your Pumpkin Pie Twists. At room temperature, store them in an airtight container or resealable plastic bag for up to 2 days. Place a paper towel in the bottom of the container to absorb any excess moisture that might make the pastry soggy. Keep them away from direct sunlight or heat sources, which can cause the pastry to become stale more quickly.
For longer storage, refrigerate the twists in an airtight container for up to 5 days. The refrigerator will help preserve freshness, though the pastry may lose some of its initial crispness. To restore crispness, reheat refrigerated twists in a 350-degree oven for 5-7 minutes or in a toaster oven until warmed through and crispy.
Avoid storing twists in the microwave or near sources of humidity, as moisture is the enemy of flaky pastry. If you’ve glazed or frosted your twists, they should be refrigerated regardless, as dairy-based toppings can spoil at room temperature. Always bring refrigerated twists to room temperature or reheat them before serving for the best texture and flavor.
Freezing Pumpkin Pie Twists for Later Enjoyment
Pumpkin Pie Twists freeze exceptionally well, making them perfect for advance preparation or batch baking. To freeze, allow the twists to cool completely after baking, then arrange them in a single layer on a baking sheet. Place the sheet in the freezer for 1-2 hours until the twists are frozen solid. This prevents them from sticking together when stored.
Once frozen, transfer the twists to a freezer-safe container or heavy-duty freezer bag. Remove as much air as possible before sealing to prevent freezer burn. Label the container with the date—frozen twists maintain best quality for up to 3 months, though they remain safe to eat beyond that time.
To serve frozen twists, you have several options. For best results, reheat them directly from frozen in a 350-degree oven for 8-10 minutes until warmed through and crispy. You can also thaw them overnight in the refrigerator and then reheat, or let them come to room temperature for about 30 minutes. Avoid microwaving frozen twists, as this can make the pastry soggy rather than crisp.
Variations and FAQs About Pumpkin Pie Twists
Can You Use Homemade Pumpkin Puree Instead?
Yes, you can absolutely use homemade pumpkin puree in place of canned pumpkin pie filling, but there are important considerations. Homemade puree tends to be more watery than canned, so you’ll need to drain it thoroughly or cook it down to reduce excess moisture. Excess water can make your pastry soggy and prevent proper baking.
When using homemade puree, you’ll also need to add your own spices and sweeteners. A good starting point is 1 cup pumpkin puree, 1/4 cup brown sugar, 1 teaspoon cinnamon, 1/4 teaspoon nutmeg, 1/4 teaspoon ginger, and a pinch of cloves. Taste and adjust to your preference, keeping in mind that the flavors will concentrate slightly during baking.
The texture of homemade puree may be less smooth than canned, which can affect how evenly it spreads on the pastry. For best results, blend or mash your homemade puree until it’s as smooth as possible before using. While homemade puree requires more preparation, it allows you to control ingredients and avoid preservatives found in some canned products.
Gluten-Free and Vegan Substitutions
Making Pumpkin Pie Twists gluten-free is straightforward with the right puff pastry. Many brands now offer gluten-free puff pastry sheets that work well in this recipe. Look for them in the frozen section of health food stores or larger grocery stores. Alternatively, you can make your own gluten-free pastry using a blend of gluten-free flours, though this requires more skill and time.
For vegan twists, choose puff pastry made without butter or eggs—many frozen brands are accidentally vegan, using vegetable oils instead of dairy. Check the ingredient list carefully, as formulations can vary. Replace egg wash with almond milk, soy milk, or aquafaba (the liquid from canned chickpeas) brushed on the pastry before baking.
Ensure your pumpkin pie filling is vegan-friendly, as some brands may contain dairy or other animal products. Most canned pumpkin pie fillings are naturally vegan, but it’s always wise to verify. The cinnamon sugar coating is naturally vegan, requiring no modifications. These substitutions allow everyone to enjoy these delicious fall treats regardless of dietary restrictions.
Making Mini Twists for Party Appetizers
Mini Pumpkin Pie Twists make elegant appetizers for cocktail parties, holiday gatherings, or baby showers. To create them, cut your pastry into narrower strips, about 1/4 inch wide instead of the standard 1/2 to 3/4 inch. These smaller twists bake more quickly, typically in 8-10 minutes, so watch them carefully to prevent burning.
Arrange mini twists on a serving platter with toothpicks or small cocktail forks for easy grabbing. They’re perfect for passing around at parties or setting out on appetizer tables. Because they’re smaller, guests can enjoy multiple twists without feeling overly full, making them ideal for events where you’re serving multiple courses.
Consider making a variety of flavors for a more interesting appetizer spread. Alongside pumpkin twists, you could make apple cinnamon twists, chocolate hazelnut twists, or savory options with cheese and herbs. The same technique works for all variations, allowing you to create an impressive assortment with minimal extra effort.
Common Mistakes to Avoid (Soggy Bottoms, Unraveled Twists)
One of the most common issues with Pumpkin Pie Twists is soggy bottoms, which occurs when the filling is too wet or the pastry isn’t baked long enough. To prevent this, ensure your pumpkin filling isn’t too runny—drain excess liquid if necessary. Bake the twists on the center rack of your oven, and consider using a preheated baking sheet or pizza stone for extra bottom heat.
Unraveled twists happen when the pastry is too warm or the twists aren’t secured properly. If your pastry becomes too soft while working, chill it in the refrigerator for a few minutes before twisting. Pinch the ends of each twist gently to help them hold their shape during baking. Don’t twist too tightly, as this can cause the filling to squeeze out and create messy results.
Overcrowding the baking sheet is another mistake that leads to uneven baking. Leave adequate space between twists—at least 2 inches—to allow for proper air circulation and expansion. If necessary, bake in multiple batches rather than cramming too many onto one sheet. This ensures each twist bakes evenly and achieves that perfect golden-brown color throughout.
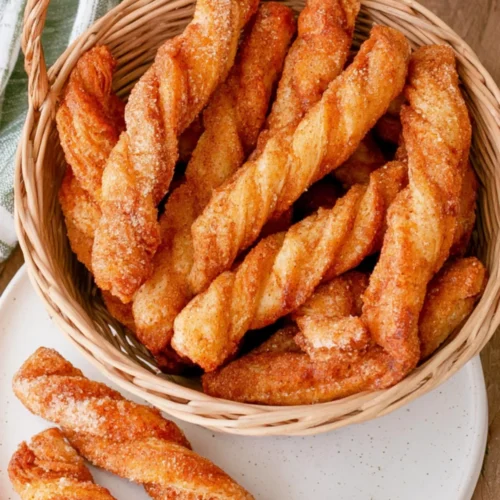
Pumpkin Pie Twists

Ingredients
- 1 sheet puff pastry thawed
- 1 cup pumpkin pie filling canned
- 1/4 cup granulated sugar
- 1 teaspoon ground cinnamon
- 1 egg beaten (for egg wash, optional)
- Melted butter for brushing (optional)
Instructions
- Preheat oven to 400 degrees Fahrenheit (200 degrees Celsius). Line a baking sheet with parchment paper.
- Prepare the pastry: Lightly flour a work surface and roll out the thawed puff pastry to about 1/8-inch thickness. Brush lightly with melted butter or egg wash if desired.
- Add filling: Spread the pumpkin pie filling evenly over the pastry, leaving a 1/2-inch border around the edges.
- Cut strips: Use a sharp knife or pizza cutter to cut the pastry into 1/2 to 3/4-inch wide strips.
- Twist: Pick up each strip and gently twist it 3-4 times. Place on the prepared baking sheet, spacing them 2 inches apart.
- Bake: Bake for 12-15 minutes until puffed and golden brown.
- Coat: Mix sugar and cinnamon together in a shallow bowl. While twists are still warm, roll them in the cinnamon sugar mixture.
- Serve: Let cool for 5 minutes before serving. Enjoy warm or at room temperature.
Notes
- For best results, use all-butter puff pastry.
- Can be made ahead and stored in an airtight container for up to 2 days.
- Freeze unbaked twists for up to 3 months; bake from frozen, adding 2-3 minutes to cooking time.